Stock the 690 Enduro R allows you to switch ABS either fully on (no good for off road), or fully off (no good for someone at my poor level of ability). However, help is at hand for us ability challenged people in the form of the ABS off-road dongle. With this dongle plugged in (plugs in to the engine diagnostics socket under the seat, so a bit of a faff to taken on /off, needs a screwdriver etc.) it unlocks an off-road ABS most – I can almost hear the gasps as I type!
So, what does this mysterious and mythical off-road mode do then? Well, I am glad you asked… When enabled, it deactivates cornering ABS (good off road), cuts ABS to the rear so you can lock it up (good off road), but retains ABS on the front (good for off road, if you are rubbish like me). So, you can imagine my delight at this purchase as I would have on road ABS (for commute and travelling to the trails), and off-road ABS for when I arrived at the trails.

I had read some articles about how each mode is selected (turning ignition key with engine kill switch in one position or another) and then using the ABS button to enable or not – just the ticket! So, a bit of a faff, but easily do-able sat on the bike with your gloved on! When they developed the 2019 690 Enduro R, one would expect that customer research from the previous model would have shown customers asking for the ability to switch between road and off-road ABS to be made easier, a little more intuitive perhaps. So, how did they improve it for the new model? Well, as it turns out, they didn’t improve it, in-fact they made it a whole heap worse! Let me try and explain!
So, as explained, on the pre-2019 690 Enduro, albeit a faff, you could switch between road ABS, off-road ABS and no ABS whilst sat on the bike, with your gloves and helmet on. For the 2019 model, that feature is removed. You either dont have the dongle plugged in, and can thus switch between no ABS and road-ABS, or you plug it in, and you can switch between no-ABS or off-road-ABS! So, the only way to switch between road-ABS and off-road-ABS is to stop, get off the bike, take your gloves off, take your seat off, rummage around in the wires to find it, get your screwdriver to free the clip physically insert or remove the dongle! Then, put everything back together and you are on your way. I am sure most KTM riders wont mind doing that each time they enter / exit a green lane! Sounds a pleasure, right! WTF were they thinking… OK on the pre 2018 model we had a great feature, but a little clumsy to use, what shall we do for the new model then, fix it? Erm, no – we will remove the feature all together! I can only imagine they had a staff trip over the border to Germany and had the day on some strong German sauce the day they made that decision!
So, how can we fix that then? Well, it turns out, with some upfront work, you can make a go of it! But, you will need to do some wiring! So, logic told me that there must be a live from the engine diagnostic port which activates the dongle once its plugged in. So, if I could work out which wire that was, I could cut it, add a switch and switch it on and off at will (without having to disconnect / reconnect). So with the switch closed, the dongle would be active, with the switch open (circuit cut) the dongle would be inactive (as if it were unplugged). I found some supporting evidence on the web that this was possible, so fished out my multi-meter….
With the ignition on, I tested each output from the diagnostic port. All wires apart from one were with no volts at all, or very low volts. One output was a constant 12v, this was the one I needed. I then compared the output from the diagnostic port to the dongle connector, to work out which wire connected up to the positive 12v output, and for me, it was the orange one (KTM, it had to be I guess!). It may or may not be the orange one on your bike, so check with a multi-meter before cutting anything!

So, in overview you need to decide where you want your switch, cut the orange wire and insert your switch between the two cut wires. For me, I didnt want to just pop a switch directly inline as it would mean I would still need to stop and take the seat off to activate the switch, so I wanted to add in a new run of cable, to allow me to mount the switch up near the handlebars (more on that in another post)!
Step 1 – locate a suitable cut location and cut the wire
I didnt want to cut the orange wire too near the connector, as if I had a disaster with connecting the switch and had to cut it off and start again, I would have little remove to recover. So, I cut about 4 inches down the black outer sleeve (careful as you do this, you dont want to cut any wires accidentally), I then cut the orange wire at that point, 4 inches or so from the connector.
Step 2 – optional, connect in extension wire!
If you are just gonna stick in a switch directly inline of the wire, just do that now, and you are done! I would personally ensure it is IP68 rated, as on my bike I do get some water under the seat during use.
If you want the switch in a better position, you will need to connect in an extension wire, to allow the switch to be mounted in a better place. You will need some wire, connectors and most likely a crimping tool. I got mine from Bikers Toolbox (who were an absolute joy to deal with, super friendly, super efficient). I purchased the following bits from them, which worked well.
- 1mm² Thin Wall Cable (I wouldn’t use a heavier gauge wire than that).
- 1 Way Superseal Weatherproof-connector x 2 (with some spare connector ends for if I messed up)
- Polyester Braided Sleeving (for the new wire to run in)
- Budget Non-Insulated Terminal crimp tool
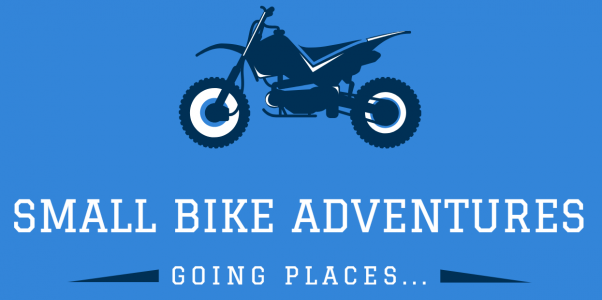
So, after cutting the orange wire I crimped on the waterproof connectors like so.
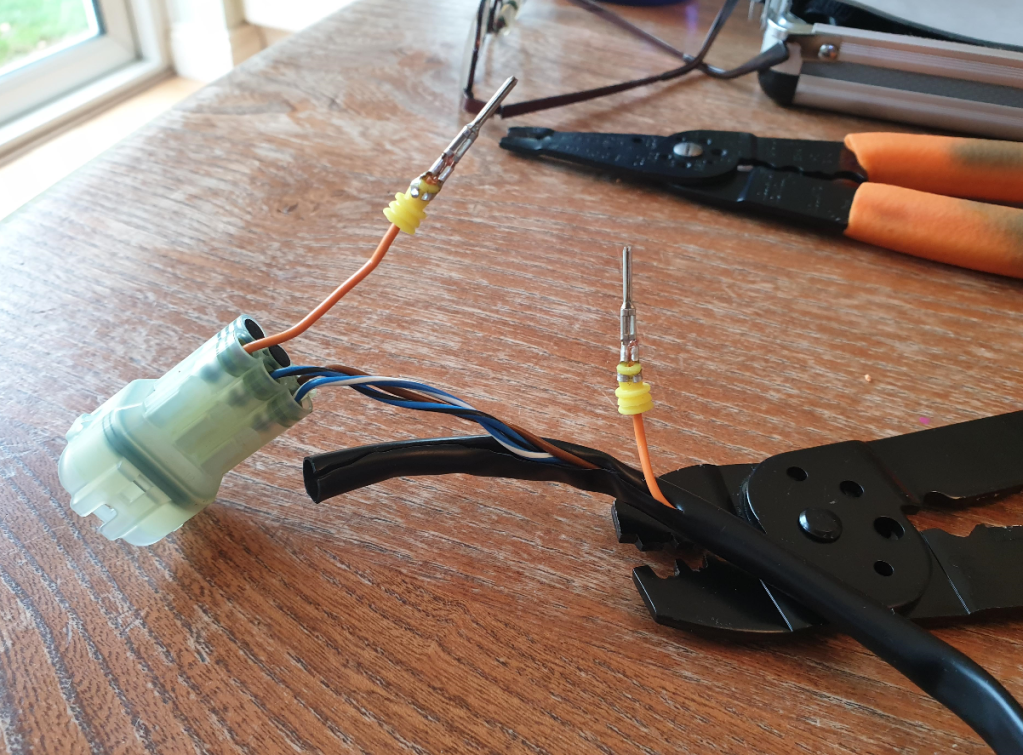
And once I had fitted the connector housing I used electrical insulation tape to seal it all back up as follows:
I then connected the orange extension cable to the connectors and mounted back on the bike like so…
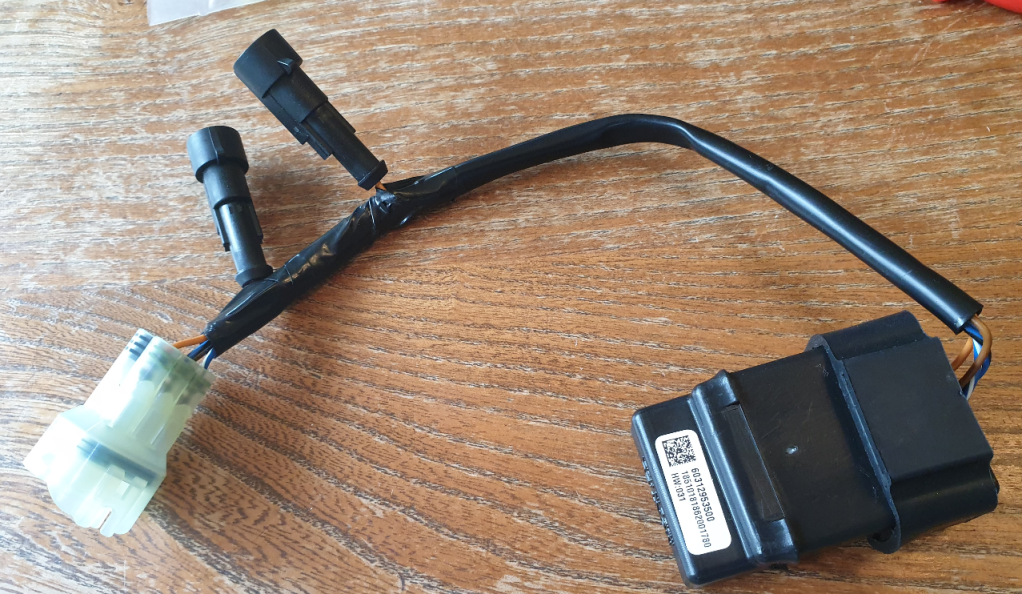
Step 3, run extension cable to switch location
Next up, run your new extension cable to where you want your switch mounted. I housed my extension cable in a braided sleeve, and used some small cable ties to attach it to the frame / other looms as needed. Be careful here, ensure you pick a safe route for your wire run, avoiding anything it may catch on, or that may move when the bike is operating. I decided following existing wire runs was the safes bet.

Step 4, fit and wire up switch
So, the final step is to mount and wire up your switch. A few things to consider when you do this. If you mount somewhere on your bars, allow enough cable slack to cater for the bars turning! Pick an IP68 waterproof switch, and IP68 waterproof connectors to connect the extension able to the switch. I selected a simple push button type switch, got about 5 of them from eBay for about £6.

I sued the same Superseal connectors to connect the extension wire to the switch. Once connected and switch mounted, you are done! Its ready to go!
Step 5, switch ABS modes in the new setup
So, with the new setup, no need to even get off the bike. When you want to change modes, simply stop and turn off the engine. Activate your new switch (which will either effectively activate or deactivate your ABS dongle), start the bike back up, and you are in the other mode. Thats all you have to do, a stop turn off, press button, start up.
I am hoping that person responsible for the 2019 design ABS dongle integration was taken outside and publicly flogged! That would be a fair penance for making me go through all that, just to get it to do what it should do straight from the factory!

Awesome write up and great idea! I’ll need to try that on mine also 🙂
If you’re interested in a Seat Concepts seat I’ll be selling my comfort XL if you’d be interested.
LikeLike
Hey Chris, thanks for the comment! Aware of the seats concept seat, what does the “XL” thing mean? Does it make bike higher or wider? What kind of price you after for it Chris?
LikeLike
Hey dude, yeah the XL seat is wider than standard but same height. It’s designed to give a wider area to sit when on road but thin at the front for when you need to stand off-road. There’s a pic here on my Instagram comparing to the standard seat https://www.instagram.com/p/CESTNEpgJdn/?utm_medium=copy_link
Price wise, about £200? I’m hoping to replace it with their tall seat version although the 3 month waiting time is a bit mental.
LikeLike
Thanks for the info Chris (and a couple of nice bike pics ya Instagram). Having looked into the Seat Concept options a little more, I will give it a miss thanks Chris. If I ever do upgrade, I would get the standard comfort profile as opposed to the XL. But thanks for the option buddy. 3 months for your new one is crackers!
LikeLike
No worries man, I would say personally the XL is too wide for proper off-road use, it hinders how far back you can get when on steep declines. The regular comfort seat should be a massive improvement over stock though! Keep up the good work, glad I found your blog 🙂
LikeLiked by 1 person