So, I had three requirements which ended up being addressed by a single modification.
First up, a bit of weather protection. Whilst most of my rides are under 50 miles (largest regular ride is 30 mile each way commute to work) so for those rides, to be quite frank, you can get by without much weather protection (I did so for years on naked bikes – a Kawasaki Z750 and a Kawasaki Z1000). But, I have (covid permitting) aspirations of many longer trips; such as a return to Spain and Andorra for another bash at the TET to name one. So, with that in mind, I wanted something to take the edge off, but without spoiling the look / purpose of the bike. So, that’s requirement number 1.
Requirement number 2, was a better place to mount my phone for navigation. I originally had a handlebar mounted RAM mount which my phone connected to, but there was only room to mount this on the far left of the handlebars, near the switch gear. Having been spoilt with a central phone mount on the 250 Rally, I knew I wanted a central and higher way to mount my phone – I didnt like the phone stuck out on the handlebar, fixing this was requirement 2.
Requirement 3 was for an ideal location to mount my bespoke ABS Dongle Switch. On the stock bike, I had seen a couple of possible options, but I didnt think any provided an ideal location. So, requirement 3 was for somewhere decent to mount the switch.
I had a look at a few options. I really liked the Rade Garage fairing kit. Looks great quality, looks in keeping with the bike (nice Dakar look!), houses better lights and so forth – it ticks all the boxes. However, its well over £1,000. Now, don’t get me wrong, I am not saying it is not worth that money, indeed I am sure it is. For me, the question was more about is it worth over £1,000 to me vs other mods I could fit to the bike for that money – you can get quite a lot for £1K! I then looked at some after market small screens – Puig for one do a small screen which screws into headlight surround (so you best keep it on if you fit it!), and I have seen other screen that avoid drilling holes by having a clamp that fits onto the top of the forks. Whilst the screens are interesting, they only solve requirement one of the three I have. A little more research led me to the Adventure Spec Mini Fairing, which on the face of it looked a good option (reasonably priced, and potential to meet all three requirements). However, as it is a generic product aimed at small capacity enduro bikes, there were some potential risks as it is not designed for you bike, but for many!
Risk 1, will it even fit on my bars at all, there is not a lot of room with handguards, switch gear and so forth. Risk 2, will the position of it once fitted obscure the display of the (ridiculously basic) instrument panel and warning lights? Risk 3, if either risk 1 or 2 prove to be a problem, can I get my money back? I have to say, the Adventure Spec guys were really helpful and responded to the questions I had in good time, but unfortunately, they just did not know if it would work out on my specific bike (risks 1 and 2), but did confirm that if I opened the packaging (which I would need to in order to see if it would work on my bike), then I would not be able to get a refund – so it was going to be a bit of a punt really. To reduce risk I utilised Facebook as my friend here, and I asked some questions on the TET group, the helpful responses I had gave me sufficient confidence to take the punt!
So, the basic product looks like this.

It has a few features I liked. A mini fairing to take the edge off the weather off (requirement 1), an AMPS compatible pre-drilled mount for a GPS / Phone (requirement 2 met), and also a couple of pre-cut holes to mount various switches (requirement 3 met). I didnt realise until I researched that AMPS is standard drill hole pattern, which many manufacturers of phone and GPS holders use. So, if you have a phone or GPS holder which is AMPS compatible, it will bold straight onto the mini fairing.
So, risk 1 was if the arms of the mini fairing would work on my congested handlebar setup. As you can see below, they do – just!

My only criticism about bolting up (same for assembling it in general), there are no torque guides as to how tight to do up any of the bolts. And as the bar clamps (blue marks on image above) as plastic, it was a concern for me to get that right. You dont want to overtighten and break it, but you certainly dont want it coming lose on the motorway or on a trail. I tightened up bit by bit, doing a quick trial ride down a local A road until I was happy there would be no movement, and left it at that!
Risk 2 was whether the mini fairing obscure the speedo / warning lights. In truth, you can make it work, its not 100% ideal, but more than good enough. To get a half decent view of the instrument panel you need to rotate the fairing a way forward (further than ideal). When you do so, you can see most (but not all) of the panel and lights – but you can see enough that you know your speed etc. If you had risers on, I suspect you would have some additional flexibility, but at the expense of a larger gap between the top of the headlight setup and the bottom of the fairing. This is the view I get of the instrument panel when sat on the bike.

But to get that good a view, the fairing is tilted forward like so. Ideally, I would prefer it tilted further back, so it follows the lines of the headlight, but if I do that, I cant see the speedo. No biggy to have it pushed forward a little.

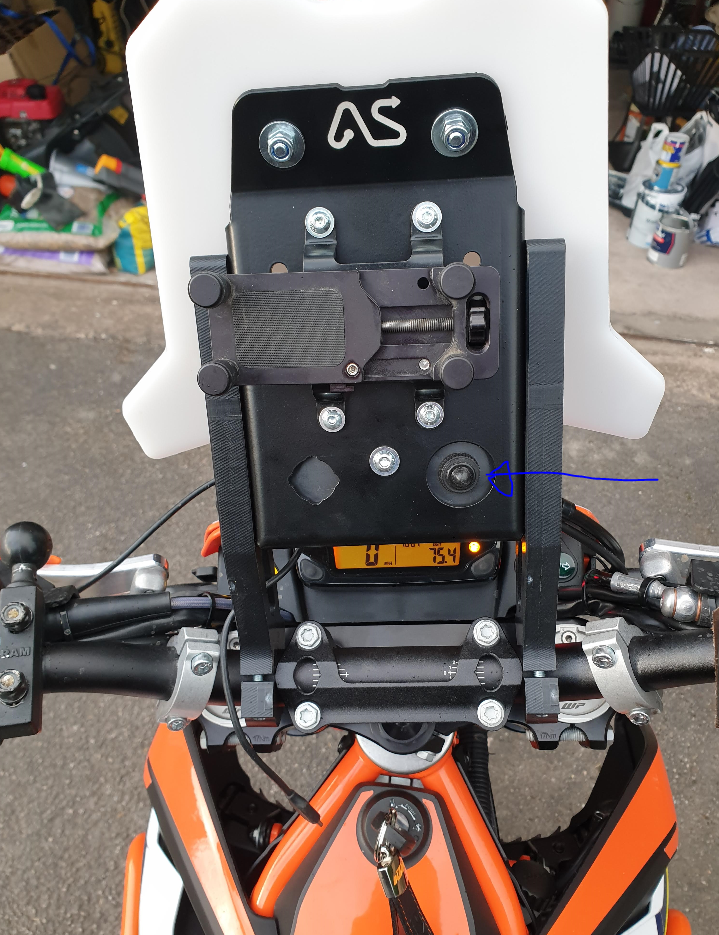
Next, mounting up my existing phone mount (the expensive but brilliant Perfect Squeeze) was a doddle, as it is AMPS compatible. It is now now meeting my requirement 2 perfectly as shown here.

So, that just left requirement 3, having a mount point for my new switch for the off-road ABS dongle. For this, I wanted to use the circular switch cut out bottom right of the fairing. Unfortunately, this was too large for my switch, so I had to create a simple backing plate (just a sheet of plastic), which I mounted from behind and drilled the correct size hole for the switch. I then wired it up with the same IP68 rated waterproof connectors I used in the main Dongle wiring. This is what it looked like from behind the plastic windshield when looking towards the front of the bike.

From the seated position, the switch looks like this…

The last part was to stick the obligatory TET sticker onto the fairing, the icing on a good mod completed and ready for action!

